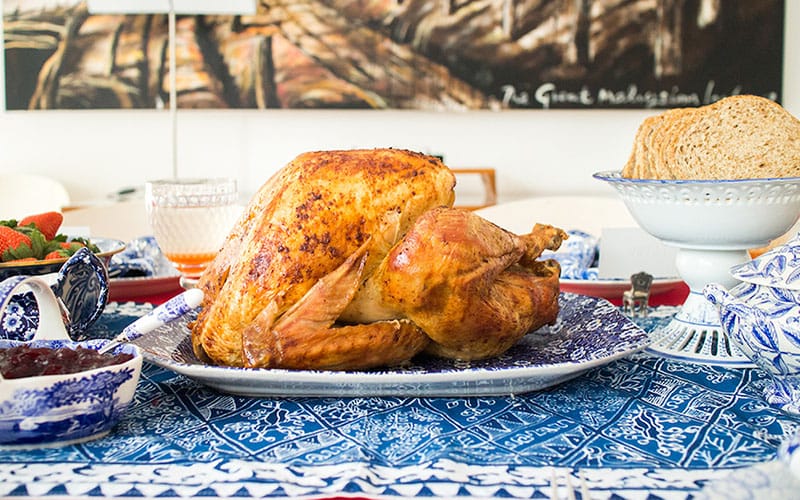
In North America, turkey is a popular dish served during Thanksgiving. In Malaysia, this extra-large bird tends to make its appearance during the Christmas season.
But turkey is not just for Christmas anymore, as this high-protein, low-fat meat is great for lowering cholesterol levels. It is also a terrific source of iron, potassium, vitamin B6, and the amino acids tryptophan and selenium, making it a healthy inclusion to your daily diet – as long as you’re talking about actual turkey and not the processed version.
Refrigerated, cooked turkey lasts for about four days. Frozen, its shelf life extends to about two to three months.
If you’re worried about the seasonality of turkey, many retailers stock frozen turkey year-round. And whether you plan to have it for a special gathering or just roast one up for your own meal prep, tackling this big bird is not as complex as it sounds.
Here’s part one of Butterkicap’s guide to preparing your turkey, from freezer to table. Check back in tomorrow and on Christmas Eve for parts two and three.
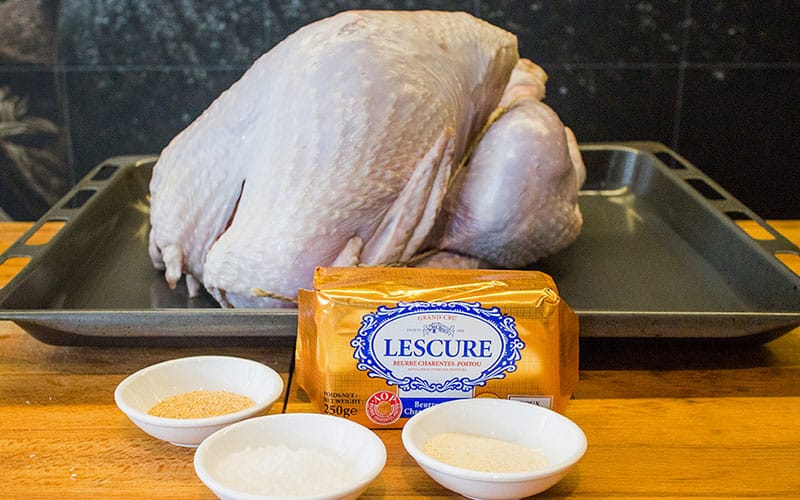
Ingredients
- 4kg whole turkey
- kosher or fine salt
- 150g butter
- 550g stuffing (store bought or homemade – try the one from this recipe)
- 5g garlic powder
- 3g onion powder
- 10g fine salt
Step 1: Defrosting
While fresh is always great, chances are your supermarket will only have frozen whole turkey in stock. As long as you’re not planning to eat the bird within the next 48 hours, it’s fine to bring it home.
The fridge method
- Leaving the turkey in its original wrapper, place it breast side up in a large container.
- Make sure your refrigerator is on its coolest setting.
- Defrost the turkey in the fridge for at least 24 hours before preparation. The timing, however, depends highly on the size of your turkey; the general rule is 24 hours for every 2kg. Most turkeys, even the smallest ones, clock in at about 4kg, so you’ll need 48 hours at the very least.
- Don’t worry if you need more time – a fully defrosted bird can last in your fridge for up to two days.
The cold water method
- Ensure your turkey wrapping has no holes and is completely waterproof.
- Make sure your container is large enough to contain the entire bird. Alternatively, use a clean sink.
- Submerged the entire turkey in cold tap water. Do not use warm, room temperature or hot water as this will breed bacteria.
You will need an hour of soaking for each kg, so a 4kg bird will require four hours. - Replace the water every 30 minutes.
- Turkey that is defrosted with this method must be cooked immediately.
Do not store in the fridge or refreeze. - Never thaw your turkey on the countertop as this, too, will breed bacteria.
Step 2: Preparation
- Once fully defrosted, remove the turkey from the fridge. Open and discard the packaging.
- If the drumsticks are held together with a piece of plastic, remove it. Also remove any other bits of plastic that hold the bird in shape.
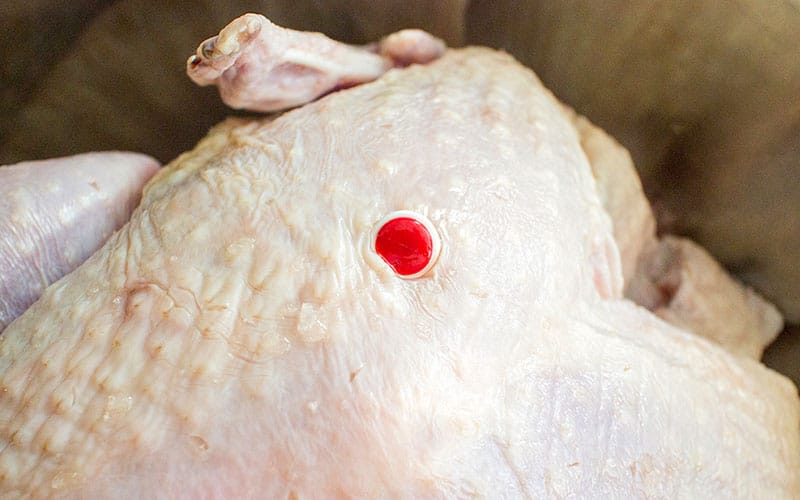
- Some turkeys come with a temperature gauge. If you have a meat thermometer, you can remove this. If you don’t, keep it in as it can help identify when your turkey is cooked.
- The temperature gauge is supposed to pop out once the turkey is cooked, but it’s best not to depend on this alone.
- The turkey cavity will likely be stuffed with its neck and usable innards. Remove these and store in the fridge for later.
- Rinse the turkey thoroughly under cold tap water.
- Drain excess fluids and pat dry with a kitchen cloth or paper towels.
Step 3: Dry brining
Brining is important as it gives you a more flavourful and succulent turkey. Generally, there are two ways to brine your bird: dry or wet.
To keep it simple, here’s the dry brining method:
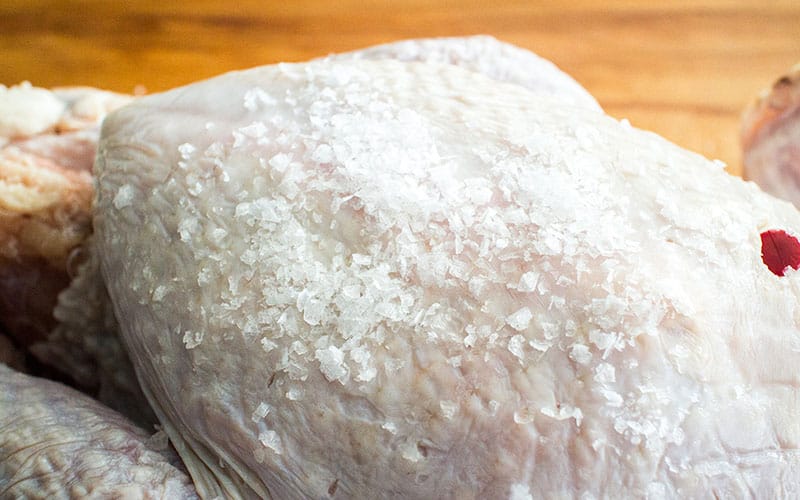
- Pat the turkey dry, then pour a generous amount of kosher or fine salt all over its skin. Put extra salt where the meat is thickest.
- Gently pat the salt into the skin and let sit for an hour.
- You can dry brine for longer, but keep the turkey refrigerated (uncovered) if you do.
- After the hour is up, or when you’re ready to roast your turkey, rinse and pat dry.
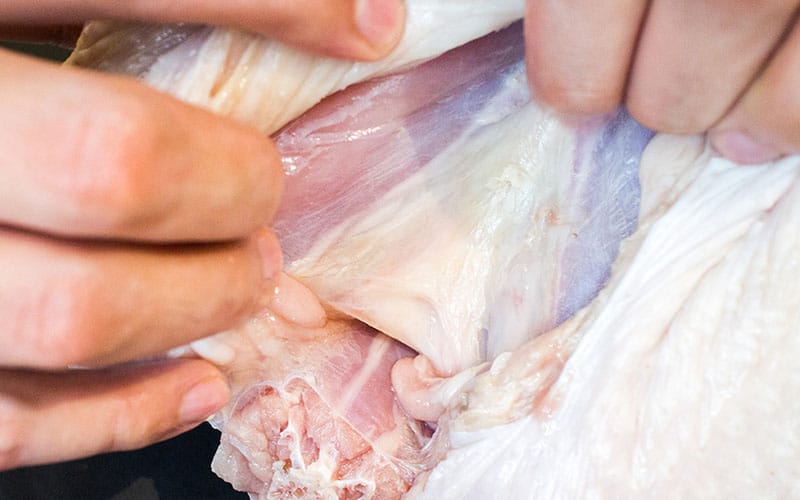
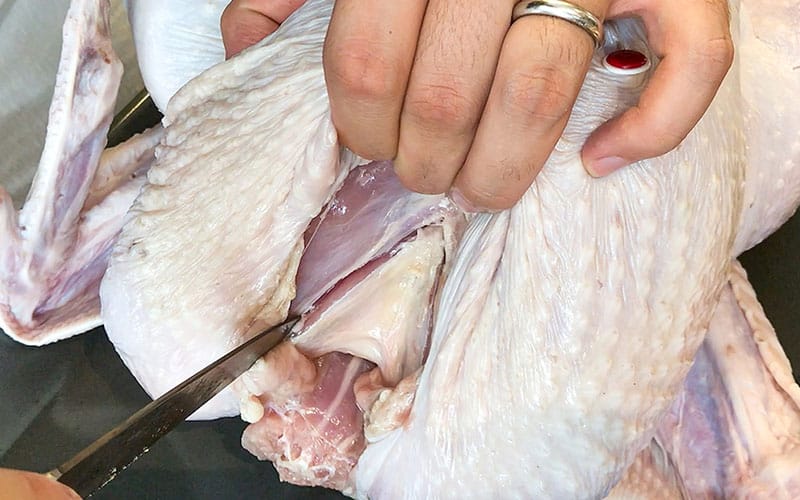
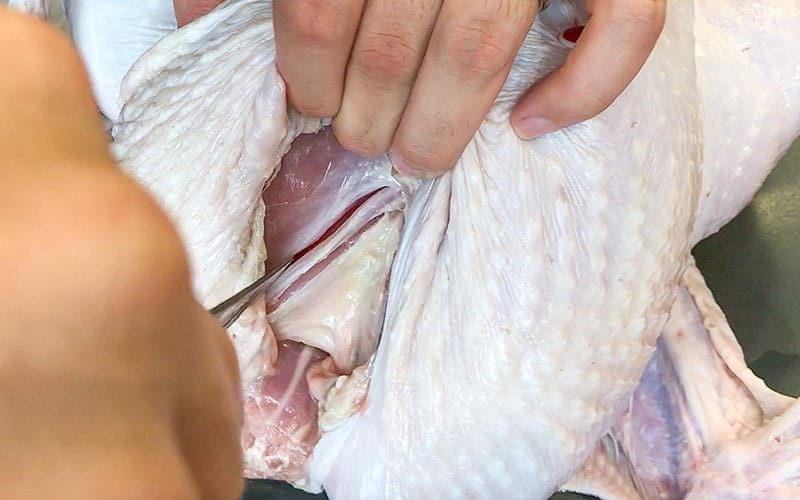
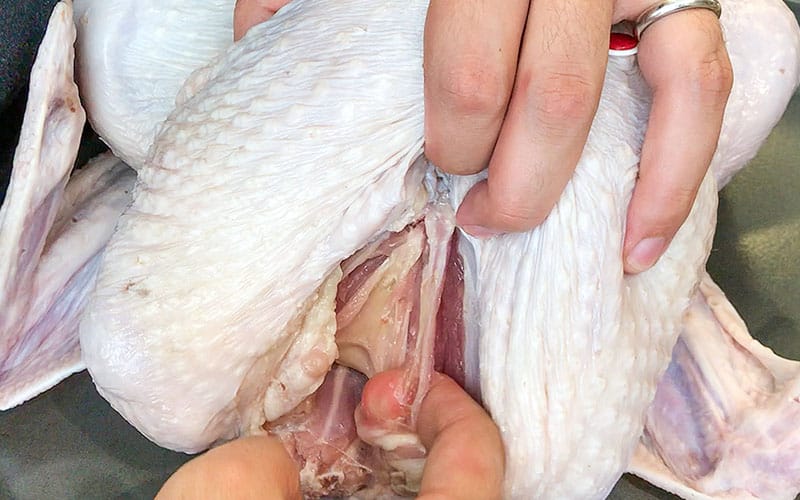
Step 4: Removing the wishbone
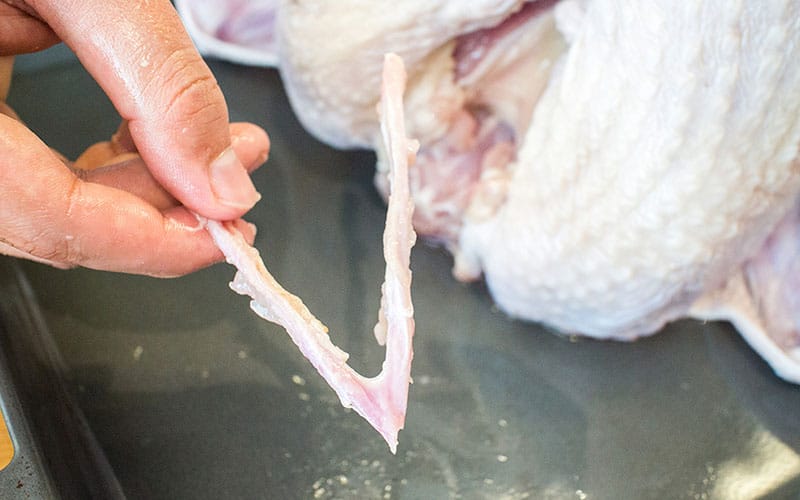
This step is entirely optional as some families love digging into a turkey and “finding” the wishbone – a V-shaped bone also known as the furcula.
If you’re unfamiliar with the tradition, the person who finds the wishbone “shares” it with someone else. Each person grabs one end of the V and makes a wish, and then they break the bone. The person with the intact centre portion will supposedly have their wish come true.
Whether or not you wish to remove the wishbone is up to you. Here’s how:
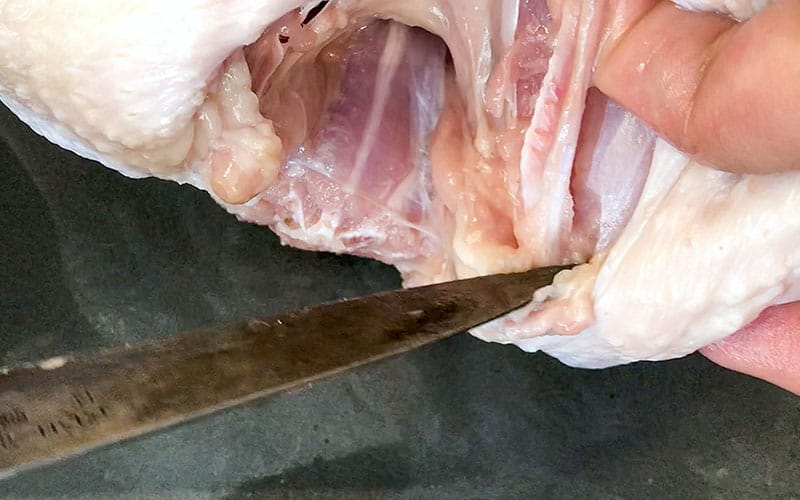
- The wishbone is located just beneath the neck joint at the top portion of the breast. You may need to push the skin aside a little. It’s identifiable by its whitish triangular shape.
- Use a sharp knife to cut along the white shape on both sides, forming an upside-down V. You should be able to feel the bone along the outer part of your knife.
- Cut immediately next to the bone so that it’s now on the inner part of your knife. Also cut along the other part of the V.
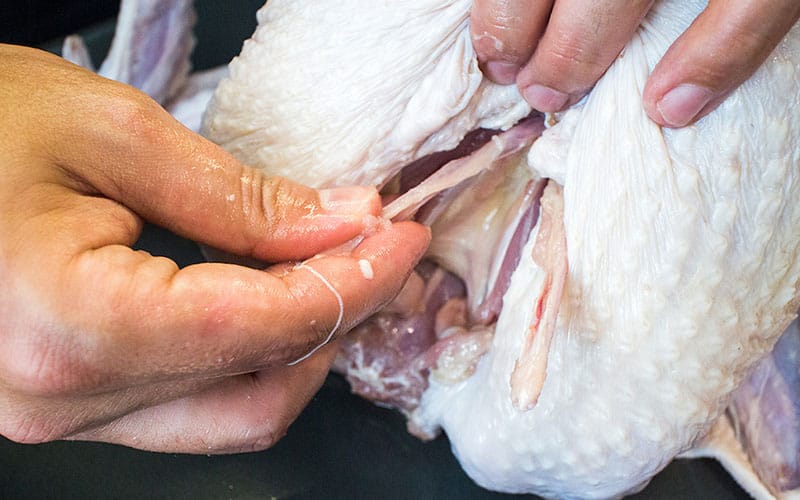
- The wishbone is still buried in the meat, so hook your finger behind it and run your finger up and down to sever the meat and sinews entirely.
- Lift the bone as far as it can go and use a knife to cut off the joint between the top part of the V that is still attached to the turkey. Be careful. Repeat on the other side.
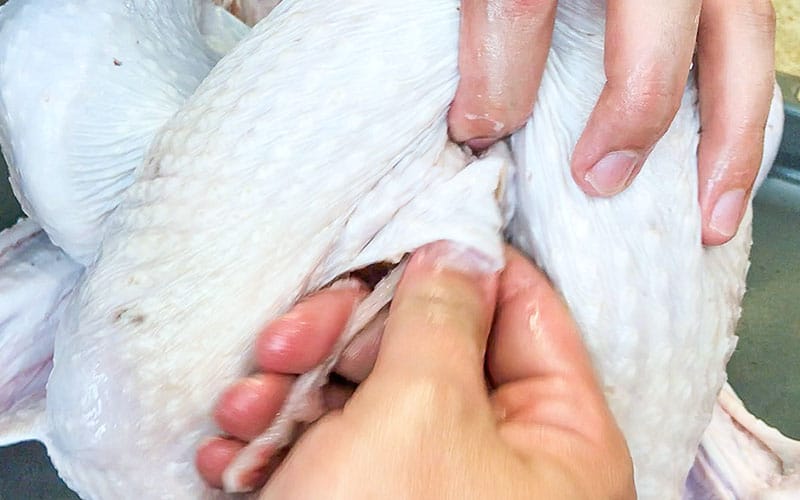
- Wrap your hand around the V “legs” and give it a few twists to remove the wishbone entirely.
Here’s a pictorial guide:
Don’t miss part two tomorrow to learn how to butter your turkey, truss it, and get roasting!
This article first appeared in butterkicap.com, a food and culture platform and community that enables anyone to experience Malaysia through stories of its people, food and places.